You have seen this photo above before but note the arm sticking out at the bottom of the base plate this will allow for the placing of one of the 1/4 20 screws in a most substantial positions remember that I purposely made the metal plate under the valve assembly in this position 1/4 inch thick. The rest of the scrap metal around the top of the melting pot was 1/8 thick This extra meet so to speak under the valve will allow for a better hold when the screws are taped.
Looking for the best position for the screws so as to give most of the pull of the handle a direct hold as nearly as possible in line with the downward force when the handle is pushed
After drilling the holes in the base plate a little white spray paint was used so the drill points could be marked. Note the half moon at the back in the photo below which will support the valve spring. It was welded on each side of the back of the base plate.
The holes were marked. A tap set can be bought for as little as $14 to $20 and an intermediate set around $50 and the prices go up from there I have a $15 set which has served me well for years.
Marked spots for drilling
Below a tap is being used in a drill press. (NO! YOU DO NOT TURN ON THE DRILL PRESS!) A light or genteel downward pressure is all that is required. As long as the part is not moved when you drilled the hole the tap will start perfectly straight. There should be a dimple in the back of the tap. The smaller cheep taps may not have the dimple but given the cost of $15 vs $50 or more I would buy the cheep ones any way. Tapping can be preformed with out a drill press but there is more of a danger in braking a small tap. Process-- the tap is oiled and started straight in the hole. Once the tap is in position and started a few turns it is turned 1/8 turn and backed off and go further an additional 1/8 turn and back off then another 1/8 turn and repeated. Keep well oiled! There are drill bit cards that are generally free from machinist supply stores they will tell you which tap to use to which drill bit. A bit that is to big will not produce threads and a bit to small will brake a tap.
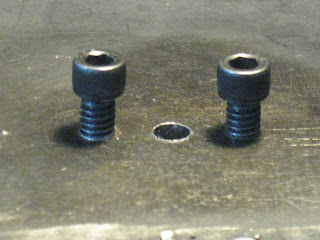
Below is the drain hole and two tapped holes. These holes were not drilled all the way through but only part way through and taped. These two holes will hold the drain plate and allow me to use this pot as a casting pot or I can remove the drain plate and use the 1/4 hole wide open as a smelter to clean lead and make large ingots. When you drill a blind hole or a dead end hole the point of the tap will bottom out-- be mindful for when the tap stops as you do not want to brake one. Some taps are designed for this kind of hole and do not have a point at the end but is square which allows the tap to go further. I did not have one or use one but was careful to not drill all the way through leaving 1/4 inch-- 3/4 inch long 1/4 20 screws.
Click for next post on this project.
A Blog has the ability to up date material and even though time has passed and this is an old post I noticed that a lot of people will only view one page and move on. So it seemed practical to place a photo of the finished product on each post.

If national disarmament came than having readily concealable information in making arms, ammo, and substitute military products would be critical. Salvaging readily available surplus military products and knowing how to use these items essential in keeping the nation free. You can now have a library of such books that will fit on a CD or flash drive for a small investment. Why not? To see military e-manuals and gun e-books click here. No waiting, get it now as an E-Book!


No comments:
Post a Comment