 |
Using the short bit first. These holes were 1/4 inch drilled on the back of the plate which will allow me to knock out a fire rod if it ever goes bad. Do not try to drill in two 1/2 inch holes from different directions and hope to align up the holes in the middle it will not happen.
|
Finding a way to drill holes could be
essential for producing any number of products. Long holes are a
particular challenge. A good example of a long hole every one
is familiar with is a gun barrel. The drill is long and has a
continual supply of oil flowing to near the point of the cutting bit
which allows the flushing out of the chips behind the smaller drill shaft. This
is a relatively simple description but sufficient to
understand that the chips if not flushed out would bind the drill shaft
and freeze the bit in the middle of the long hole. Even a gofer must take the time to remove the dirt or he would be digging his own tomb. With out such a
flushing system then you would need to withdraw the bit and remove the chips.
What you will see is a simple system but a little time consuming. The 8
inch holes in the casting pot started with a undersized pilot hole then a larger
bit and finally a 1/2 bit about 6 inches long. This was the simple
part for the twist in the drill bit removes the chips. A long bit has the same
5 or 6 inches of twist at the front and is then supported by a solid shaft.
This shaft leaves the chips trapped and soon the drill bit will come to a
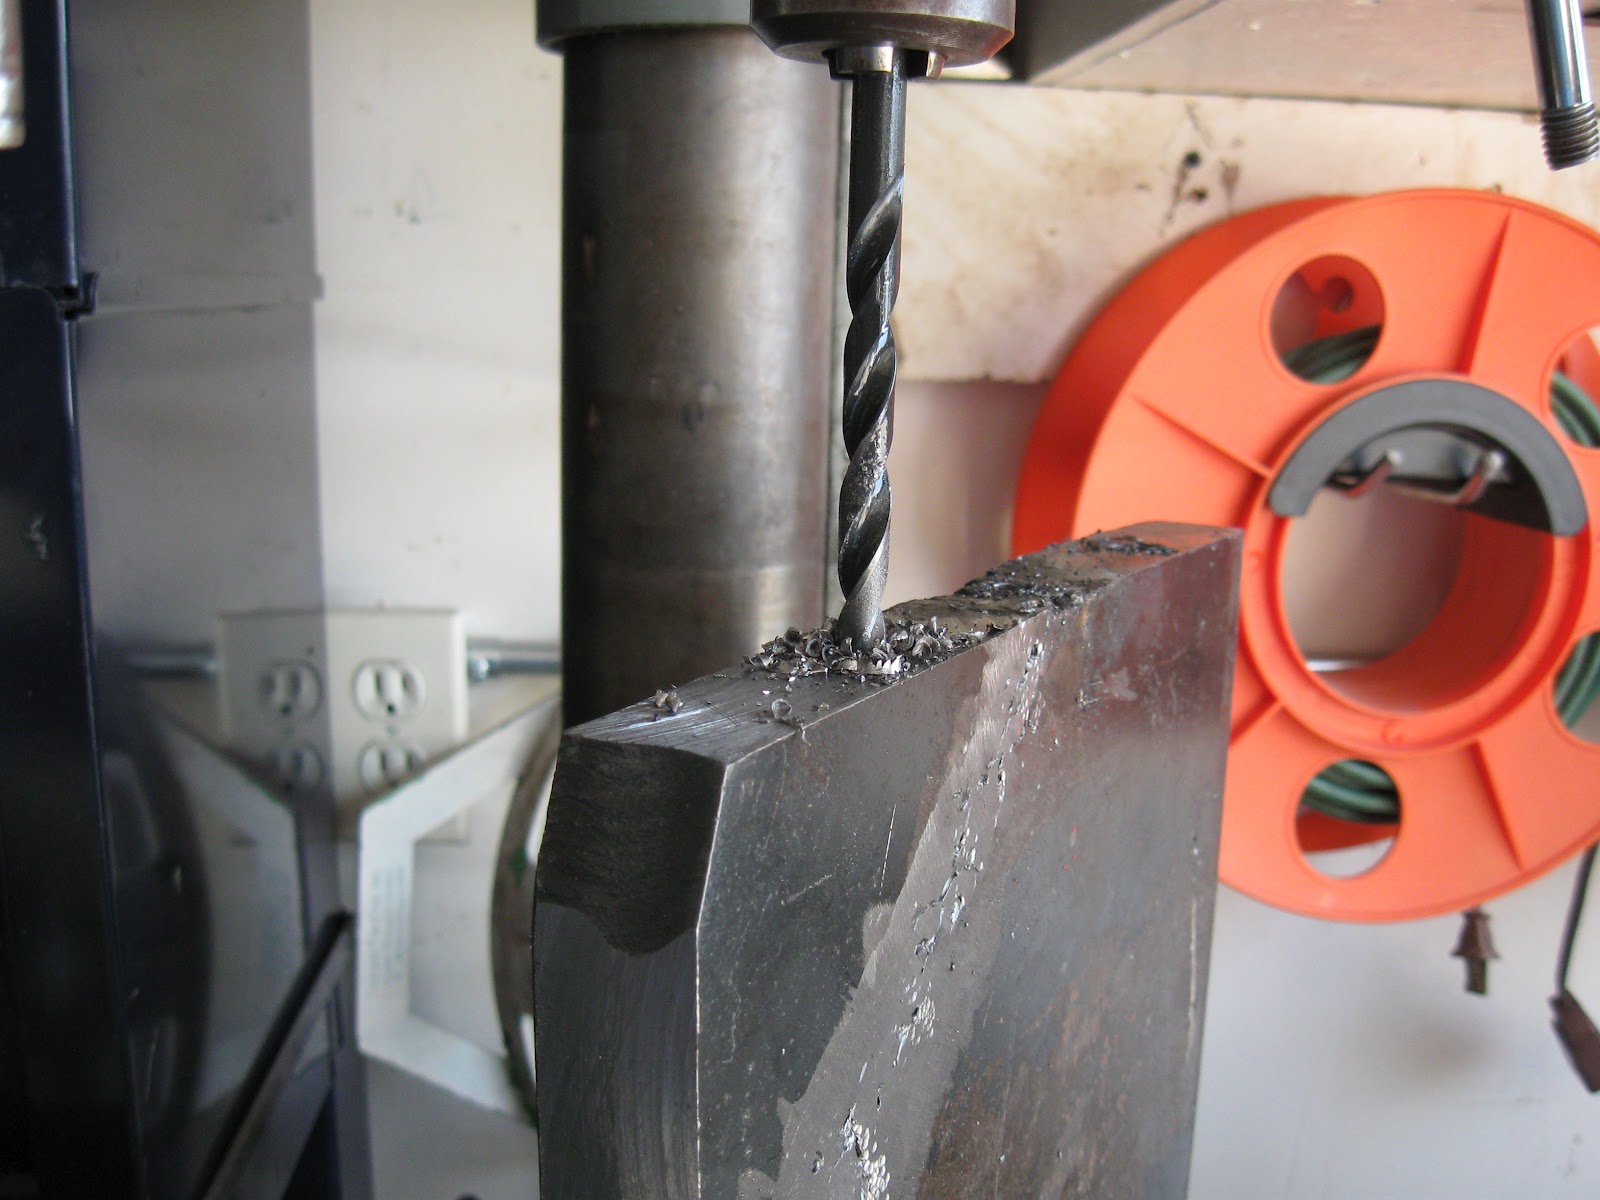
complete stop. The process from the photos below is simple. Secure
the work piece in a drill press vice and line up the location to be drilled use
"C" clamps to secure the drill press vice. Add a few drops of oil to
the hole each time before drilling. Drill no more than 1/4 inches in at a time
when you are using a very long drill bit, lower the drill table and swing the
table to the side and use a mechanics magnet to remove the chips
still left in the hole. Swing the table back into position add oil and insert
the bit in the hole with the drill off. Raise the table in tell the bit bottoms
out in the hole. Secure the table clamping lever behind the drill press table.
Look at the measurements by the drill handle and turn on the drill-go down 1/4
inch-- and repeat the process.

This system could be used if you ever had to make a gun barrel. In Drilling the 8 inch fire rod holes do not get in a hurry. This bit is 1 ft long and proposed some problems in drilling these holes First the location for the holes was noted and marked and second a center punch was used to mark the location of the hole and then a small bit was used to drill the initial holes. Next a short 1/2 inch drill bit was used to drill a hole as deeply as possible. (The shape of the lip of the metal was a factory flaw) The holes were drilled a little lower so the welding on the top would not propose a problem and reduce the risk of possible burn through.

Note the chips in the groves will clog the bit and can bind the metal and drill bit causing problems use the measuring marks on the drill press to calculate the depth of each plunge so that you only go about 1/4 inch and no further than (3/8in is pressing your luck) or you will have problems. The drill press table was then lowered and the table swung aside and the chips were removed with a magnet.

 |
| Removing the chips from the hole with an automotive magnet. It took 3hrs and 20 minutes to drill the three 8 inch deep holes but in looking at them as short gun barrels it would have equaled 3 Sub Machine Gun barrels or one every hour and seven minutes. |
Two "C" clamps were used to hold the drill press vice in place and this allowed the table to swing back and realign with the bit and the hole. The process was again repeated with a plunge of the drill bit. You can not rush this --total time 3 hours and 20 minutes. So if you were making a gun barrel that that would be about 1 hour and 6 minutes. A few drops of oil was placed in the hole before the bit was used again. The drill bit was inserted in the hole while it was off so as not to create a larger hole. In reinserting the bit turn the chuck by hand if the bit comes to a stop while lifting the drill press table.To view the next post click
A Blog has the ability to up date material and even though time has passed and this is an old post I noticed that a lot of people will only view one page and move on. So it seemed practical to place a photo of the finished product on each post.

If they pass laws against guns then you will either make your supplies at home, salvage or do without. A lot of gun function problems are because the owner does not know how to take it apart and clean it. Below 1) SKS instruction manual 2) M1 Garand Instruction manual 3) M14 and M14A instruction manual with Bipod instructions. To see military e-manuals and gun e-books click here www.firstpatriotpress.com. No waiting, get it now as an E-Book over 70 to chose from!
No comments:
Post a Comment